Wednesday, August 13, 2014
bathroom test 3D
http://www.ziddu.com/register.php?referralid=(yOvjvm~@L.
http://downloads.ziddu.com/download/23970269/bathroo.jpg.html
http://WeeklyYouthPay.com/?ref=217191
http://adf.ly/r6BJE
http://adf.ly/?id=7544342
Thursday, August 7, 2014
How to use VRayPhysicalCamera
This tutorial show you the example function of vrayphysical cam.
Example 1: exposure control - f-number (f-stop)
This parameter controls the aperture size of the virtual camera. Lowering the f-number value increases the aperture size and so makes the image brighter, since more light enters the camera. In reverse, increasing the f-number makes the image darker, as the aperture is closed. This parameter also determines the amount of the DOF effect, see Example 9.Exposure is on, Shutter speed is 60.0, ISO is 200, Vignetting is on, White balance is white.


Example 2: exposure control - Shutter speed
This parameter determines the exposure time for the virtual camera. The longer this time is (small Shutter speedvalue), the brighter the image would be. In reverese - if the exposure time is shorter (high Shutter speed value), the image would get darker. This parameter also affects the motion blur effect, see Example 10.Exposure is on, f-number is 8.0, ISO is 200, Vignetting is on, White balance is white.


Example 3: Exposure control: film speed (ISO )
This parameter determines the sensitivity of the film and so the brightness of the image. If the film speed (ISO) is high (film is more sensitive to the light), the image is brighter. Lower ISO values mean that the film is less sensitive and produces a darker image.Exposure is on, Shutter Speed is 60.0, f-number is 8.0, Vignetting is on, White balance is white.


Example 4: Zoom factor
This parameter determines the zooming (In and Out) of the final image. It doesn't move the camera forward nor backwards.Exposure is on, f-number is 8.0, Shutter speed is 60.0, ISO is 200.0, Vignetting is on, White balance iswhite


Example 5: Vertical shift (Camera Correction)
Using this parameter you can archive the so called "2 point perspective". To have that done automatically, use the button.


Example 6: Distortion
The difference between the two types of distortion is slightly visible. The Cubic type should be used in some camera tracking programs like SynthEyes, Boujou etc.


Example 7: Vignetting
This parameter controls the simulating the optical vignetting effect of real-world cameras.


Example 8: White balance
Using the white balance color allows additional modification of the image output. Objects in the scene that have the specified color will appear white in the image. E.g. for daylight scenes this should be peach color to compensate for the color of the sun light etc.Exposure is on, f-number is 8.0, Shutter speed is 200.0, ISO is 200.0, Vignetting is on


Example 9: Depth Of Field (DOF)
To enable the DOF effect you need to turn on the Depth-of-field option in the Sampling rollout of the physical camera. The effect is most strongly seen when the camera is close to some object, like when doing a "macro" photo. For a strong DOF effect, the camera aperture must be open wide (i.e. small f-number value). That may lead to a very burnt and bright image, so to preserve the same illuminosity over the whole image, the shutter speed must shortened. And at last but not at least the focus distance determines which part of the scene will be actually on focus. To get the focus near, you would need a small value and reverse - higher value for far focus.Exposure is on, f-number is 1.0, Shutter speed is 4000.0, ISO is 200.0, Vignetting is on


Example 10: Motion Blur (MB)
To enable the motion blur effect you need to turn on the Motion blur checkbox in the Sampling rollout of the physical camera. The amount of the motion blur is determined by the speed of the moving object itself as well as the Shutter speed setting of the camera. Long shutter speeds will produce more motion blur, as the movement of the object is tracked over a longer in time. In reverse, short shutter speeds will produce less motion blur effect. Keep in mind that to preserve the same illuminosity over the whole image, the f-number value has to be corrected as well.Note that in the example the far object is moving quicker than the near one, which cases the difference in the motion blur effects.Exposure is on, ISO is 200.0, Vignetting is on


Basic learning about VraySun and VraySky in 3D Max
VraySun and VraySky
The VRaySun and VRaySky are special features which are provided by the V-Ray renderer. Developed to work together, the VRaySun and VRaySky reproduce the real-life Sun and Sky environment of the Earth. Both are coded so that they change their appearance depending on the direction of the VRaySun.
VRaySun parameters
The VRaySun is located in the (Create - Lights - VRay) panel.You can also specify the VRaySun as the sun type inside a 3ds Max Daylight system.
Enabled - turns on and off the sun light.Invisible - when on, this option makes the sun invisible, both to the camera and to reflections. This is useful to prevent bright speckles on glossy surfaces where a ray with low probability hits the extremely bright sun disk.Turbidity - this parameter determines the amount of dust in the air and affects the color of the sun and sky. Smaller values produce a clear and blue sky and sun as you get in the country, while larger values make them yellow and orange as, for example, in a big city.Ozone - this parameter affects the color of the sun light. Available in the range between 0.0 and 1.0. Smaller values make the sunlight more yellow, larger values make it blue.Intensity multiplier - this is an intensity multiplier for the VRaySun. Since the sun is very bright by default, you can use this parameter to reduce its effect.Size multiplier - this parameter controls the visible size of the sun. This affects the appearance of the sun disc as seen by the camera and reflections, as well as the blurriness of the sun shadows.Shadow subdivs - this controls the number of samples for the area shadow of the sun. More subdivs produce area shadows with better quality but render slower.Shadow bias - moves the shadow toward or away from the shadow-casting object (or objects). If the bias value is too low, shadows can "leak" through places they shouldn't, produce moire patterns or making out-of-place dark areas on meshes. If bias is too high, shadows can "detach" from an object. If the bias value is too extreme in either direction, shadows might not be rendered at all.Photon emit radius - determines the radius of the area, in where photons would be shot. This area is represented by the green cyllinder around the Sun's ray vector. This parameter has effect when photons are used in the GI solutions or caustics.
Sky Model - Allows you to specify the procedural model that will be used to generate the VRaySky texture.- Preetham et al. - when this mode is selected the VRaySky procedural texture will be generated based on the Preetham et al. method.
- CIE Clear - when this mode is selected the VRaySky procedural texture will be generated based on the CIE method for clear sky.
- CIE Overcast - when this mode is selected the VRaySky procedural texture will be generated based on the CIE method for cloudy skyIndirect horiz. illum. - specifies the intensity (in lx) of the illumination on horizontal surfaces coming from the skyExclude - this button allows you to exclude objects from illumination/shadow casting for the sun light.
VRaySky parameters
The VRaySky texture map is typically used as an environment map, either in the 3dsmaxEnvironment dialog, or in one of the slots of the V-Ray Environment rollout and behaves very much like a HDRI environment map. The VRaySkychanges its appearance based on the position of the VRaySun.
Manual sun node - specifies how the VRaySkydetemines its parameters:Off - the VRaySky will automatically take its parameters from the first enabled VRaySun in the scene. In this case, none of the other parameters of VRaySky are accessible.On - you can choose a different light source. It is recommended that you choose only direct lights, as the vector for the direction is taken into consideration when computing the appearance of the sky. In that case theVRaySun is no longer controlling the VRaySky and the parameters in the texture map rollout determine the final look of the sky.Sun node - specifies which light source is chosen if Specify sun node is On.Sun turbidity - refer to VRaySun parametersSun ozone - refer to VRaySun parametersSun intensity multiplier - refer to VRaySun parametersSun size multiplier - refer to VRaySun parametersSun invisible - when this option is on, the sun disk will not be visible on the sky texture.
Sky Model - Allows you to specify the procedural model that will be used to generate the VRaySky texture.- Preetham et al. - when this mode is selected the VRaySky procedural texture will be generated based on the Preetham et al. method.
- CIE Clear - when this mode is selected the VRaySky procedural texture will be generated based on the CIE method for clear sky.
- CIE Overcast - when this mode is selected the VRaySky procedural texture will be generated based on the CIE method for cloudy skyIndirect horiz. illum. - specifies the intensity (in lx) of the illumination on horizontal surfaces coming from the sky
Notes
- By default, the VRaySun and VRaySky are very bright. In the real world, the average solar irradiance is about 1000 W/m^2. Since the image output in V-Ray is in W/m^2/sr, you will typically find that the average RGB values produces by the sun and the sky are about 200.0-300.0 units. This is quite correct from a physical point of view, but is not enough for a nice image. You can either use Color mapping to bring these values to a smaller range (which is the preferred way) or you can use the Sun intensity multiplier to make the sun and sky less bright. Using the VRayPhysicalCamera with suitable values also produces a correct result without changing the sun and sky parameters.
this tutorial for change the colour of your 3dMax
that was easy way to change the interface colour of 3d studio max 2010 is by simply opening the "customize" drop down list at the top and selecting the first one on it "Customize User Interface" when the screen opens simply go to the "colour" drop down and this lets you shange the colour for every little aspect of the program.
many option for the colour changes, so try it now and get what colour for your 3dmax theme.
many option for the colour changes, so try it now and get what colour for your 3dmax theme.
Wednesday, August 6, 2014
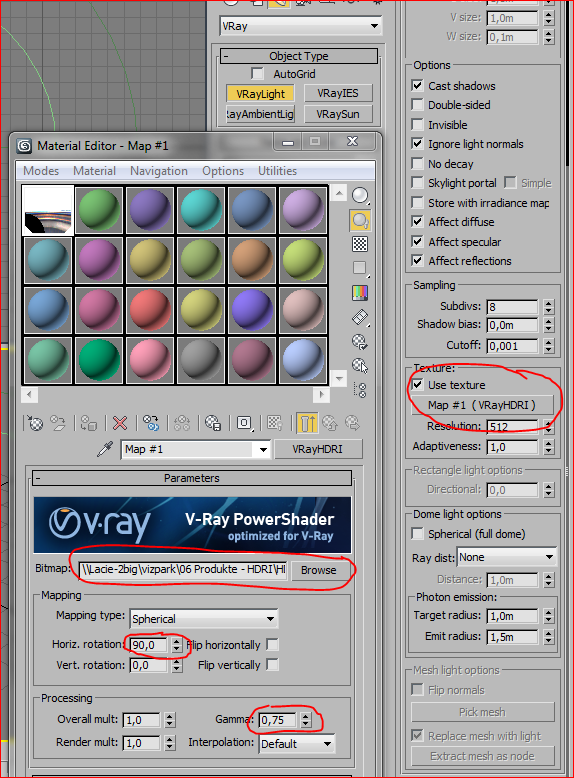
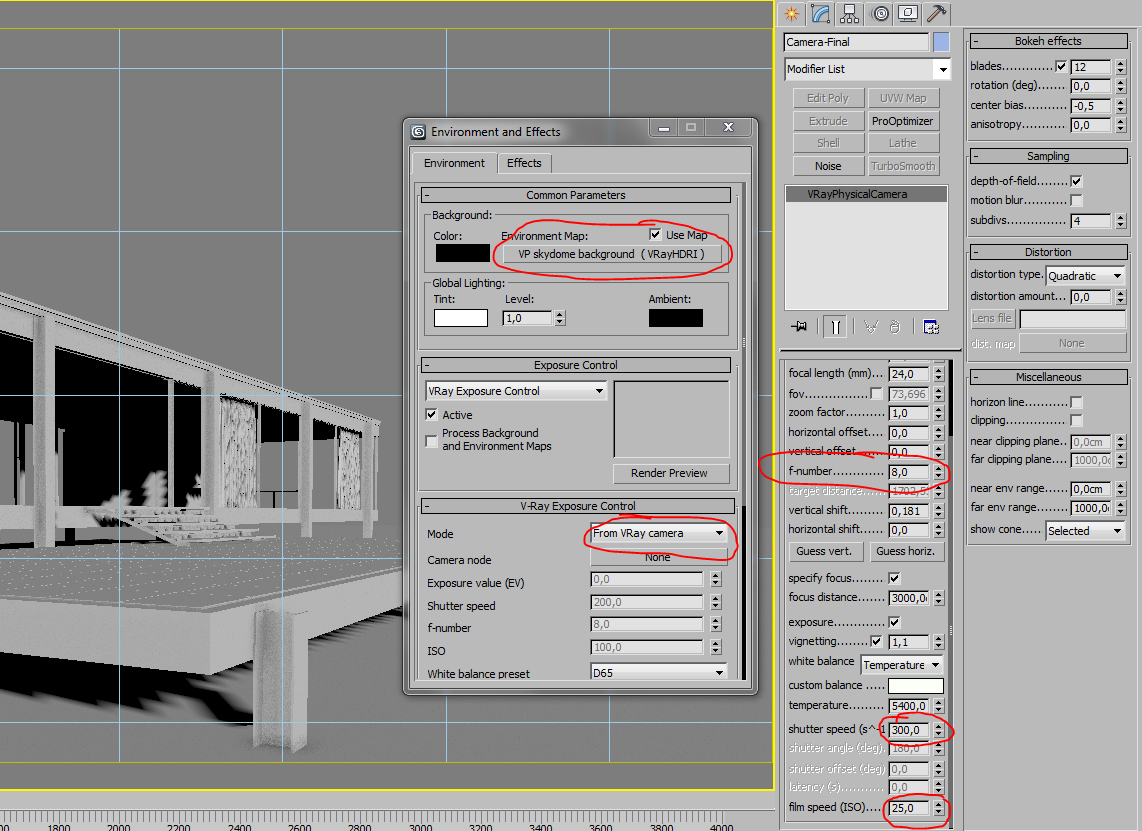
Exterior lighting with HDRI
The VP HDRI Skydomes have a very high dynamic range, which is best to create sharp sun shadows. Also they have an accurate white balance that will bring convincing and colorful lighting into your scene with a few clicks.
Basically you just need to follow 2 main steps: First to create a vray light dome and second to create a vray physical camera with proper exposure settings.
Until this point, we have created our light system, in the next point we will treat the camera settings. Before we move onto the next point, let’s speak about the gamma setting. This setting allows colors to have more punch and contrast, in an high dynamic range context it means that bright spots are much brighter than normal, therefore creating sharper and stronger shadows. You can decrease this value if you feel the light is a bit too flat to bring more contrasts, or increase it if the light gets too harsh.

There are basically two things we want to achieve when setting up the camera: a proper exposure, and an adequate white balance.
If you want to use the same hdri skydome for the background, you can just add the same map to the environment slot of the render Environment Map. If you can´t match the background with the lighting of the vray domelight, you can also create a second copy of the vrayHDRI map with different settings and split these two.
Setting up the white balance :
Using the temperature option is probably the easiest as you can directly change a value and get a cooler or warmer result. For most of conditions, a value ranging from 4500 to 6500 should give you best results. You can always use the eyedropper of the Vray Frame Buffer to see whether a supposed white area is too blue or too red and adjust the temperature according. If it is too warm one must decrease the value, and oppositedly if it is too cold one must increase the value.
Also, sometimes having white areas looking blueish or reddish can lead to a better overall result and is dependant on the mood you try to achieve !
Subscribe to:
Posts (Atom)